Help

Kilibi

  • Grade context: SA
  • Photos: 15
  • Ascents: 1
  • Aka: Shard
2

Seasonality

J
F
M
A
M
J
J
A
S
O
N
D

Summary

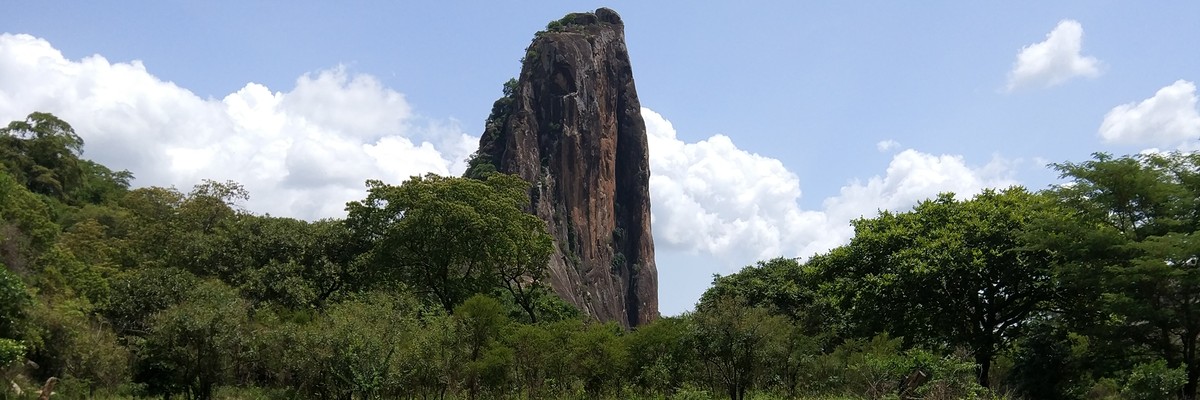
This shard looking tower is one of the most impressive and intimidating rocks you'll see anywhere in Uganda. There are two known routes to the top and potential for more.

©

Description

Near the village of Akwang in the Paimol sub-area of Agago District, there is great climbing potential. We only climbed Kilibi Rock. (see Deep in the Village and Normal Route) A drive around the area to/from Kalongo will yield other impressive rocks and possible climbs. Mt. Kokil is next to Kilibi and looks hikeable. There may be a number of quality lines there and in the adjacent rocks . This area is very near the climbs of Amiel and Mt. Oret. About an hour’s drive will get you to Rwot and Loyoroit.

The map shows the Kilibi inside the shape in the west. The shape in the east shows the parking and the line on the map links the parking and the rock showing the approximate hike in.

©

Access issues

Free and unrestricted. This area sees very little interaction with the outside world. It is like going back in time! People are very friendly. They ask for money. We usually give a small give gift like a bag of salt or rice.

©

Approach

Drive through Paimol and then through Akwang. Just a couple hundred meters after Akwang, there is a easily missed left turn just before a bridge. You’ll need a 4WD because this turn goes down into a ditch and up to a very poor road. Follow that road as far as you can past the huts, trending to the right to Joseph’s house (3.11523, 33.42742). You’ll be about 200m off the main Akwang road when you park. You’ll be unable to see Kilibi from here, but tell locals you want Kilibi and they will all point you in the right direction. A couple hundred meters past the parking at Joseph’s you’ll see Kilibi.

If unsure, you can ask around for Joseph and should ask permission to park there. He's a very nice/friendly guy.

If you don't have a strong car, or prefer a better road, you could also park at Akwang on the main road and walk in. The hike from Joseph's is about 40 mins. Locals can show you the way or follow your gps or the map.

©

Where to stay

This is easily reachable from guest houses in Kalongo.

©

Ethic

Nobody lives at the foot of this rock, so nobody is likely to ask money for climbing it. Locals live a few hundred meters away. This also means that trails run out a bit near Kilibi. Some bushwhacking is necessary to reach the rock itself in rainy season, however the approach is less bushy than Amiel and Mt. Oret. Please be friendly and kind to the local people. They have let us climb in the past but as this is their community, please play by their rules.

©

History

History timeline chart

I first saw this rock in 2016 and hunted around for the best approach. We returned and climbed two routes on Kilibi in 2017. Deep in the Village has only been climbed once. There is no mentioned of this rock in either the 1962/63 guidebook or the 1991 guidebook. It is also not mentioned on any other climbing websites.

©

Some content has been provided under license from: © Matt Battani (Matt Battani)

Routes

Add route(s) Add topo Reorder Bulk edit Convert grades
Grade Route
1 14 60m
2 12 60m
3 18 X 60m
4 20 40m
5 15 30m
6 8 25m

Deep in the village 20 (Descrition by M Battani and U Pitsch) (approximately N3.11206° E33.40837°) Get up early for this one as it is a full day with the drive from Kalongo, parking, hiking, rapping, and getting home. We left our guest house in Kalongo at 6:15am. You may want to carry your boots/shoes on the climb because the descent is on the opposite side of the climb. We hiked barefoot back to our gear at the base of the first pitch. It hurt.

The route starts on the north east side of Kilibi Rock. You can see a big ramp leading up Kilibi. The first pitch starts up this ramp. Aim for the large flake about 60m up for your first stance.

  1. 14, 60 m Largely a walk up. Graded 14, maybe easier. Start up a ramp 5m or so before your first pro under a flake. This pitch required lots of very small cams and a couple nuts. Pretty well protected. Some flakes sound a bit hollow. There is a bomber place to build an anchor under a strong flake just before a steepening. This pitch trends slightly right near the end and could be broken up into a 40 m and a 20 m pitch.

  2. 12, 60 m Follow up the ramp to a stance in a good crack and pocket just below the butress. Build your anchor here. Not a very well protected pitch, but an easy climb.

  3. 18X, 60 m The face above is difficult and poorly protected. Follow up the arête, over a black face bearing right, then further up the arête to a stance on a small but comfortable ledge. Very sparse protection, but good holds!

  4. 20, 40 m (Crux) Pro here is much better than the last pitch. P4 pitch trends right, following a crack, and goes over a little tree to a great anchor/stance at some trees above. From the stance climb up to a bench. From the bench, climb up to gain a fist wide crack on the right. It is an excellent but strenuous layback crack with very good protection (Black Diamond cams 1 to 5 fit in this flaring crack). After the crack, continue easily up the ramp to a stance somewhere after the first few bushes. There are some solid trees to build a great anchor.

  5. 15, 30 m Leave the trees, follow the crack across a black face to a huge ledge. Mostly a scrample.

  6. 8, 25m, summit scramble, from the belay scramble up to the right through some boulders. Congrats! Enjoy the photos. You can see Mt. Oret and Amiel really clearly from here completing the “Agago Triangle”. Descent notes: scramble and descend down the west (nearly opposite side of “Deep”) via the Normal Route. Deep in the Village lacks sufficient rappelling points, so to save your pro/tack, go down via the Normal Route which has the trees/bushes necessary to enable a cheaper descent. The downclimb to the first abseil is bold. Go down a 4m chimney, then downclimb over some slab to boulders and then to a bush. From that bush, begin your rap down. Go right down the spine of the rock past a bushy crack and some tufts of grass towards some boulders. It is a one pitch (50m) abseil as you can scramble down from the pile of boulders below. It is a long rap, so careful not to go off the end of your ropes. Scrambling the entire descent is possible as well. From the foot of Kilibi, hike around to reach the trail out to your car. Hiking either way around Kilibi works, but we found the south side to be easier than the north. Once reaching the first pitch, you’ll hike east back to Joseph’s house to reach your car.

FFA: Matt Battani, U Pitsch & W Rutowski, 23 Jun 2017

1 14 50m
2 10 50m
3 8 20m

Description by Uwe Pitsch The route starts on the west side of Kilibi Rock.

  1. 14, 50 m Climb the spine of the rock to a bush with a rope slung around it for abseiling

  2. 10, ? m Continue up over boulders and short faces, if in doubt stay left.

  3. Scramble / walk to the summit through a narrow gap between 2 huge boulders, chimney up at the end of the gap.

FFA: Uwe Pitsch, 22 Jun 2017

Hello!

First time here?

theCrag.com is a free guide for rock climbing areas all over the world, collaboratively edited by keen rock climbers, boulderers and other nice folks.

You can log all your routes, connect and chat with other climbers and much more...

» go exploring, » learn more or » ask us a question

Accommodations nearby more Hide

Share this

Photos Browse all photos

Upload a photo of area

Wed 24 May
Check out what is happening in Kilibi.

Get a detailed insight with a timeline showing

  • Ticks by climbers like you
  • Discussions of the community
  • Updates to the index by our users
  • and many more things.

Login to see the timeline!

Deutsch English Español Français Italiano 한국어 Português 中文