Seasonality
Access issues inherited from Blue Mountains
The Blue Mountains are a World Heritage listed area. The Grose Valley, the cliffs around Katoomba and much of the Narrow Neck peninsula are part of the Blue Mountains National Park which is managed by the NPWS. The Western Escarpment - where most of the climbing is - is Crown Land managed by the BMCC. While the NPWS Plan of Management nominates several locations in the National Park where rock climbing is deemed appropriate, the majority of the climbing remains unacknowledged. To maintain access our best approach is to 'Respect Native Habitat, Tread Softly and Leave No Trace'. Do not cut flora and keep any tracks and infrastructure as minimal as possible.
Practically all crags are either in National Park or in council reserve: dog owners are reminded that dogs are not allowed in National Parks at any time and fines have been issued, while for crags on council reserve the BMCC leash law requires that dogs be on-leash.
For the latest access related information, or to report something of concern, visit the Australian Climbing Association NSW Blue Mountains page at https://acansw.org.au/blue-mountains/
Ethic inherited from Blue Mountains
Although sport climbing is well entrenched as the most popular form of Blueys climbing, mixed-climbing on gear and bolts has generally been the rule over the long term. Please try to use available natural gear where possible, and do not bolt cracks or potential trad climbs. If you do the bolts may be removed.
Because of the softness of Blue Mountains sandstone, bolting should only be done by those with a solid knowledge of glue-in equipping. A recent fatality serves as a reminder that this is not an area to experiment with bolting.
If you do need to top rope, please do it through your own gear as the wear on the anchors is both difficult and expensive to maintain.
At many Blue Mountains crags, the somewhat close spacing of routes and prolific horizontal featuring means that it is easy to envisage literally hundreds of trivial linkups. By all means climb these to your hearts content but, unless it is an exceptional case due to some significant objective merit, please generally refrain from writing up linkups. A proliferation of descriptions of trivial linkups would only clutter up the guide and add confusion and will generally not add value to your fellow climbers. (If you still can't resist, consider adding a brief note to the parent route description, rather than cluttering up the guide with a whole new route entry).
If you have benefited from climbing infrastructure in NSW, please consider making a donation towards maintenance costs. The Sydney Rockclimbing Club Rebolting Fund finances the replacement of old bolts on existing climbs and the maintenance of other hardware such as fixed ropes and anchors. The SRC purchases hardware, such as bolts and glue, and distributes them to volunteer rebolters across the state of New South Wales. For more information, including donation details, visit https://sydneyrockies.org.au/rebolting/
It would be appreciated if brushing of holds and minimisation/removal of tick marks becomes part of your climbing routine. Consider bringing a water squirt bottle and mop-up rag to better remove chalk. Only use soft (hair/nylon) bristled brushes, never steel brushes.
The removal of vegetation - both from the cliff bases and the climbs - is not seen as beneficial to aesthetics of the environment nor to our access to it.
Remember, to maintain access our best approach is to 'Respect Native Habitat, Tread Softly and Leave No Trace'. Do not cut flora and keep any tracks and infrastructure as minimal as possible or risk possible closures.
For the latest access related information, or to report something of concern, visit the Australian Climbing Association NSW Blue Mountains page at https://acansw.org.au/blue-mountains/
Tags
Plan your Trip
Some content has been provided under license from: © Australian Climbing Association Queensland (Creative Commons, Attribution, Share-Alike 2.5 AU)
Information needed
This crag does not have a description. Can you share a summary introduction to this crag?
If you can help provide a better quality resource for the climbing community then please click 'edit this crag' button near the top of the page.


Selected Guidebooks more Hide
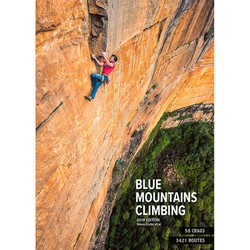
Author(s): Simon Carter
Date: 2019
ISBN: 9780958079082
The latest comprehensive, latest and greatest Blue Mountains Climbing Guide is here and it has more routes than you can poke a clip stick at! 3421 to be exact. You are not going to get bored.
ⓘ
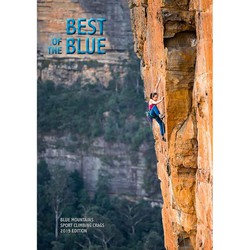
Author(s): Simon Carter
Date: 2019
ISBN: 9780958079075
Simon Carter's "Best of the Blue" is the latest selected climbing guide book for the Blue Mountains and covers 1000 routes and 19 different climbing areas. For all the sport climbers out there, the travellers, or just anyone who doesn't want to lug around the big guide that's more than 3 times the size - cut out the riff-raff and get to the good stuff! This will pretty much cover everything you need!
ⓘ
Accommodations nearby more Hide
Share this
Nearby Icons
| 19 | ★★ The West Face of the Mirrorball | ||
| 21 | ★★★ Mirrorball | ||
| 24 | ★★★ Weaselburger | ||
| 25 | ★★★ Samarkand | ||
| 26 | ★★★ Critical Mass |
Photos Browse all photos

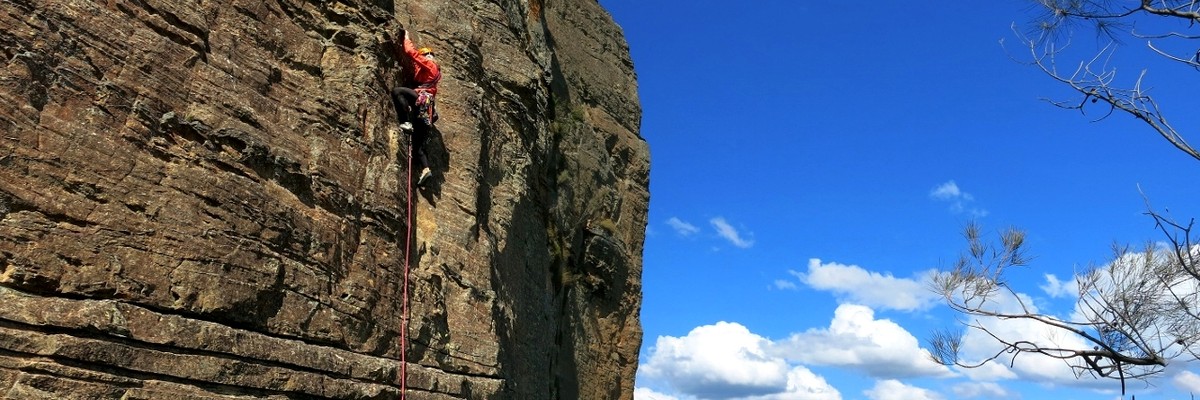
Henryk on ★ Disco Dancer 22 - P1030512.jpg

Marty Doolan on ★★★ Samarkand 25 - IMG_0005 (5).jpg

Ro-boat on ★★ The Silk Road 19 - Ro on pitch 3

Marty Doolan on ★★★ Samarkand 25 - IMG_9852 (2).jpg
Thu 18 May
Check out what is happening in Lunch Ledge.
Get a detailed insight with a timeline showing
- Ticks by climbers like you
- Discussions of the community
- Updates to the index by our users
- and many more things.
Login to see the timeline!